因为日常工作和这个博客的内容不完全相同,不想把 coding agent 里的对话和上下文混在一起,所以需要做身份隔离。
ChatGPT 给出的方案,亲测能用
因为日常工作和这个博客的内容不完全相同,不想把 coding agent 里的对话和上下文混在一起,所以需要做身份隔离。
我的主力编辑器是 VS Code,两种 coding agent 分别是 Codex 插件和 VS Code 自带的 GitHub Copilot。
Linux 上的 codex
1. 建立一个新的 Profile
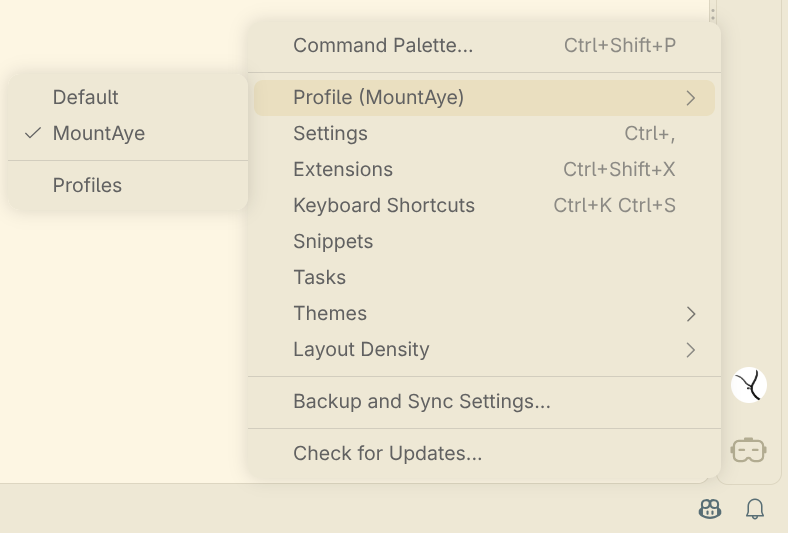
点击右边栏最下面的按钮,在弹出的菜单里选择 Profile → Profiles 新建一个新的 profile,各种配置可以直接复制,但是建议换个色彩主题,如果不小心切错号了可以马上发现。
2. 建立两个 Codex Home
在 terminal 执行:
mkdir -p ~/.codex-identity1
mkdir -p ~/.codex-identity2
然后为了避免 Linux keyring 带来的额外变量,建议这两个环境都明确使用文件保存认证:
echo 'cli_auth_credentials_store = "file"' > ~/.codex-identity1/config.toml
echo 'cli_auth_credentials_store = "file"' > ~/.codex-identity2/config.toml
(ChatGPT 说)官方文档确认 file 模式会把认证信息保存为 $CODEX_HOME/auth.json
注意:
auth.json是敏感凭据,不要提交到 Git。
3. 让 VS Code 启动时使用不同的 CODEX_HOME
在 ~/bin/ 中建立两个文本文件 code-identity1 和 code-identity2
~/bin/code-identity1
#!/bin/bash

export CODEX_HOME="$HOME/.codex-identity1"

exec code \
     --user-data-dir "$HOME/.vscode-identity1" \
     --profile Default \
     "$@"
~/bin/code-identity2
#!/bin/bash

export CODEX_HOME="$HOME/.codex-identity2"

exec code \
     --user-data-dir "$HOME/.vscode-identity2" \
     --profile Identity2 \
     "$@"
给两个文件都加上可执行权限:
chmod +x ~/bin/code-identity1
chmod +x ~/bin/code-identity2
然后在每个 profile 第一次运行的时候登陆 codex 账号。
这样,只要在启动时想好自己要用哪个身份,然后用对应的带后缀的命令取代之前的 code .,就可以分离 codex 插件的账户;code 命令后面的参数都可正常使用。
Windows 上的 codex
0. 确认 PowerShell 版本
打开 Windows PowerShell,输入下面的命令来确认版本:
$PSVersionTable.PSVersion
# Major  Minor
# -----  -----
# 7      ...
PowerShell 7 和 PowerShell 5.1 都可以完成这个方案。
1. 创建两个 Codex Home
在 PowerShell 中执行
New-Item -ItemType Directory -Force "$HOME\.codex-identity1"
New-Item -ItemType Directory -Force "$HOME\.codex-identity2"
运行下面的命令,应该看到:
Get-ChildItem "$HOME" -Directory -Filter ".codex-*"
# .codex-identity1
# .codex-identity2
2. VS code 方面
建立新的 Profile。
在 PowerShell 运行:
Get-Command code正常情况下应该能找到 VS Code 的 CLI。
code --version如果能显示版本号,就没问题;如果提示找不到命令,需要处理 PATH
3. 创建两个 PowerShell 函数
在 PowerShell 中运行 notepad $PROFILE
如果提示文件不存在,可以:
New-Item -ItemType File -Force $PROFILE
notepad $PROFILE
在打开的空白文件中粘贴:
function codex-identity1 {
    param(
        [Parameter(ValueFromRemainingArguments = $true)]
        [string[]]$Path
    )

    $env:CODEX_HOME = "$HOME\.codex-identity1"

    code @Path --profile "OpenAI-identity1" `
        --user-data-dir "$HOME\.vscode-openai-identity1"
}

function codex-identity2 {
    param(
        [Parameter(ValueFromRemainingArguments = $true)]
        [string[]]$Path
    )

    $env:CODEX_HOME = "$HOME\.codex-identity2"

    code @Path --profile "OpenAI-identity2" `
        --user-data-dir "$HOME\.vscode-openai-identity2"
}
保存。不用关闭终端,运行 . $PROFILE
检查
Get-Command codex-identity1
Get-Command codex-identity2
应该都能找到。
4. 让 VS Code 启动时使用不同的 CODEX_HOME
在文件浏览器的地址栏输入 powershell,可以在当前目录位置运行 powershell。
根据自己想使用的身份选择 code-identity 命令。
第一次打开的时候需要登陆 codex 账户,之后可以自动登录。
GitHub Copilot
Windows 和 Linux 上的操作都一样。
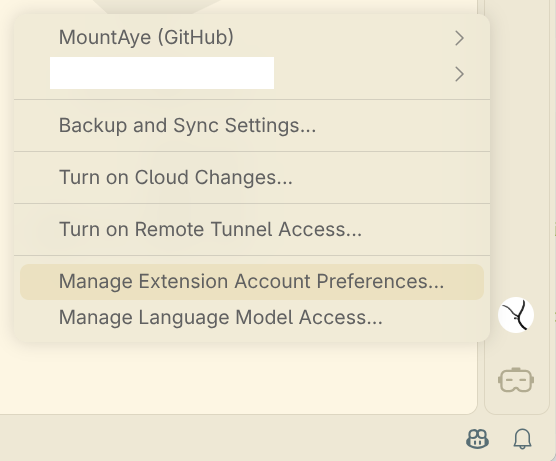
点击 VS Code 右下角的头像,在弹出的菜单中选择 “Manage Extension Account Preferences…”
然后窗口上方会出现可以选择账户的拓展,选择 “GitHub Copilot”
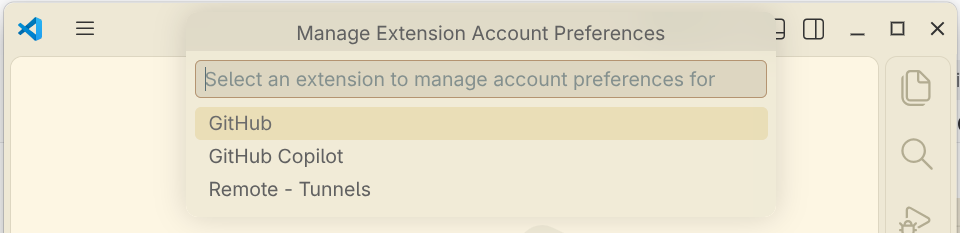
选择当前 Profile 希望使用的账号。
本文收录于以下合集: